Saturday, May 7, 2011

LOVE

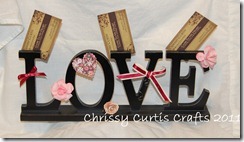
Such a simple word that holds much depth and complexity.  Here is a little photo holder that I added a few things to.love pic holder

(So just imagine some of your favorite pictures where I have business cards.)

You can see a couple of different ribbons have been tied into bows, I punched out a scalloped heart and also added three paper roses.

(Item available in my etsy shop.)


Enjoy!

For my friend, mentor, partner in ‘crime’, inspiration…my Mom

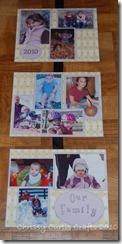
This Mother’s Day present was a year in the making.  Last year I made a 3 panel wall hanging for my Mother-In-Law.  My Mom has been hearing for the past year about all the ‘wall art’ with pictures I have made for family members.  This year for Mother’s Day, I hope she will be surprised to be getting one of her own.  By using a 20x20 canvas I was able to get an 8x10 group shot of my four kids, four individual 5x7’s of my kids, and a 5x7 of my brother’s two kids, so that all six grandkids were together (even if we couldn’t be together for picture taking). 

All products are CTMH unless otherwise stated.

20x20 canvas (local craft store)

Deckle edge scissors by Fiskars (craft store)

Glimmer thread (Sulky metallic thread found with the sewing notions in my local craft store)

Matte Mod Podge (craft store)

Scotch Advanced Tape Glider adhesive (craft store)

Paper retired Veranda paper pack

Sunflower and Daisy White cardstock

Edge Distresser (Z1090)

Stamp sets Bohemian Alphabet (E1019) and Simple Blossoms (C1247)

Colonial White buttons (from the mini medley Z1276)

Two sizes Bitty Sparkles (Z1104)

Black and Sunflower Exclusive Inks

Liquid Glass (Z1313)


I took a nontraditional approach to putting this together.  Most people would dive right in from the beginning using Mod Podge.  I however decided to play it a little bit safe because, let’s face it, a canvas this size is not cheap!  So I adhered the paper with my tape gun first, then put some matte Mod Podge on top to seal it.  I then used the tape gun again to adhere the pictures.

For the title I used the Boho alphabet and Sunflower ink, used my edge distresser then added some sunflower ink for a little ‘pop’.  It was still looking a little naked, so I decided to add some of the smallest Sparkles to the center of any flower in the Boho stamping.  I then stamped the bunch of three flowers, cut them out using my deckle edge scissors and again distressed with Sunflower ink.  I had to add a little bling and it fit perfectly where the stem and the flower meet.

I next moved onto the paper rose. (Compliments of Michelle Auten)  BACKSTORY ALERT!  My moms dad had the most beautiful peace roses I had ever seen.    I struggled to get the shading just as I had remembered, but in the end had to settle for more subtle shading.

I have found myself addicted to adding this thread to any and all buttons I use on my projects.  It’s very fine and almost hard to see, but gives the buttons that little touch of attitude.  But they too still looked a little naked, and when in doubt I turn to bling, in this case Sparkles.

I attached the paper rose and the buttons using Liquid Glass, and finished the whole thing with more Matte Mod Podge.

Happy Mother’s Day to the woman who showed me: how to be soft and strong at the same time; how to love with all my heart; and to this day inspires me to be better than the day before.

I love you Mom.
2010 mothers day 2010                               20x202011

Enjoy!    

Thursday, May 5, 2011

Teacher Appreciation Gifts

Since it is customary to give teachers flowers for Teacher Appreciation week, I thought “How can we do something that won’t die in a week?”.  One of my CTMH team mates Michelle Auten (our resident paper princess) shared some fantastic paper flowers with us at the last team meeting.

I decided to go with small painted terracotta pots instead, I like to have the kids have their hands in on gifts that are to be from them.  This project was perfect in my mind for the teachers because now they keep their flowers forever with no digging, planting, or watering to worry about.

I have to say that the one thing I did forget was to put the year and my daughters name on them…oops! And just like at Christmas time, Jilly reminded me “Mommy I have four teachers.  I may not see Mrs. Cohrs and Mrs. Monarch everyday, but I do still see them.”  So again we made them for her current teachers and her teachers from last year.

teacher app

Enjoy!

Why I do what I do.

People often ask me once they find out that I love to craft and create, "What is the one project you are most proud of?" My answer is always the same, "My five kids!" They are the reason I have been scrapbooking for so many years. I want to be able to capture their childhood through pictures, and evoke emotion through the art of scrapbooking. I found a wonderful company, Close To My Heart (CTMH), that allows me to do just that. Their breathtaking line of paper packs with coordinating embellishments and stamp sets take the guess work out of scrapping, and they are a huge time saver. And let's be honest, when it's fun it's easier to get a project done. Once I discovered CTMH, I decided to become a consultant so that I am better equipped to share the joy I feel when preserving memories that will be passed on for generations to come.


Another benefit to using Close To My Heart products is the versatility they offer. Not only do you get to create and protect your precious memories by scrapbooking, but you can also use the paper packs and embellishments to create personalized and unique cards as well as sprucing up your home decor. I love having the ability to transform a simple photograph into a piece of art I am proud to display in my home or give as a gift to a special person.


It is not the amount of 'creative talent' but rather the level of interest and passion you possess that will determine what we are capable of accomplishing together. Let me show you how simple, quick and most importantly fun scrapbooking and paper crafting can be.